こんにちは、ニタです。
またしてもWordPressネタですが、プラグインを作ったのなら公開してみるのも良いと思います。WordPressをお使いの方々に多少貢献出来るかもしれません。
そこで、今回はWordPressプラグインの申請、公開方法をまとめした。
事前準備・用意するもの
wordpress.orgのアカウント
アカウント登録はこちらからできます。最低でもusernameとemailが入力していれば登録できます。
登録すると、入力したメールアドレスにwordpress.orgからusernameとpasswordが記載されたメールが送られてきます。
こちらでログインすると、プラグインとテーマの申請、WordPressのフォーラムへの参加ができるようになります。
プラグインファイル一式
当然ですが、動作テストし問題ない状態でリリースしましょう。
※今回は割愛しますが、管理画面などに項目を追加するようなプラグインの場合、表示項目の国際化処理をするのをおすすめします。
readme.txtを書く
プラグインには、readme.txtを追加する必要があります。
このtxtファイルを基に、WordPressプラグインページが作成されます。
表記内容は、WordPressのreadmeファイルの標準に沿ったものになり、MarkDown記法で記載していきます。
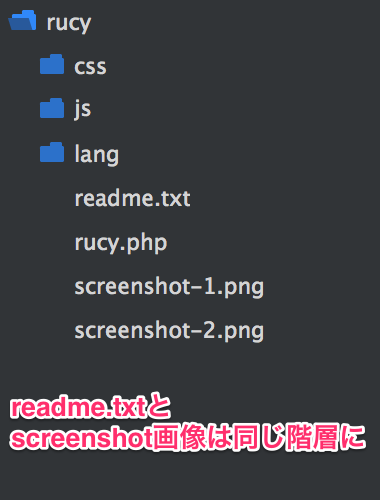
readme.txtは、プラグインディレクトリの直下に置きます。
表記例はこんな感じ。
=== Rucy ===
Contributors: gips-nita
Tags: post, update content, update post, update page, schedule update, reserve update, reservation update, rucy, Rucy
Requires at least: 3.5+
Tested up to: 3.9
Stable tag: 0.2.0
License: GPLv2 or later
License URI: http://www.gnu.org/licenses/gpl-2.0.html

Add reservation update published content.

== Description ==

You can automatically update the DateTime specified posts published by this plugin.

Post and Page, specify custom post type is also possible.

But in your WordPress, this plugin is a prerequisite is that the reservation can be posted (can use WP_CRON is required).

== Installation ==

You can install this plugin directly from your WordPress dashboard:

 1. Go to the *Plugins* menu and click *Add New*.
 2. Search for *rucy*.
 3. Click *Install Now* next to the *rucy* plugin.
 4. Activate the plugin.
 5. Configure reservation post type in *rucy* in *Setting* menu.

== Screenshots ==

1. Added Reservation Content Editor in Editor.
2. Reservation Content Type Setting Page.

== Frequently Asked Questions ==

== Changelog ==

= 0.2.0 =
* 2014-06-13
* fixed Bugs.
* change input type reservation datetime.
* add check validation reservation datetime is past.

= 0.1.2 =
* 2014-05-04
* add reservation datetime post updated messages.
* add "revision" and "attachment" in invalid custom post type Setting
* refactoring

= 0.1.1 =
* 2014-04-25
* if accept checkbox unchecked , clean schedule update content.
* modified revision post_type do not add schedule update.
* add donation link.

= 0.1.0 =
* 2014-04-18 First release
表記する項目は、以下のとおり。MarkDown記法で記載していきます。
=== [プラグイン名] ===
Contributors: [WordPress.orgで登録したusername]
Tags: [プラグインを検索した時にヒットされやすいタグをカンマ区切りで記載]
Requires at least: [このプラグインが動作保証出来るWordPressの最低バージョン]
Tested up to: [プラグインの動作テストで使用したWordPressのバージョン]
Stable tag: [動作保証出来るプラグインのバージョン]
License: GPLv2 or later (ライセンス)
License URI: http://www.gnu.org/licenses/gpl-2.0.html (ライセンスのURL)
| == Description == | 詳細説明 |
| == Installation == | インストール方法 |
| == Screenshots == | スクリーンショットの説明。 1.一番目のスクリーンショットの画像の説明。 スクリーンショット画像は、上記の番号に対応するスクリーンショット画像を用意します。 ファイル名は、screenshot-[番号].[拡張子] 拡張子は、png/jpg/jpeg/gifのいずれかです。 画像ファイルは、readme.txtと同じ階層に配置しておきます。 |
| == Frequently Asked Questions == | よくある質問。初回は項目があるだけでも構いませんが、想定される質問を記述するのもいいでしょう。 |
| == Changelog == | 更新履歴。更新する度に追記していきます。 |
説明用コメントアウトの更新
プラグインのphpファイルに、コメントアウトでプラグインの説明を記述していると思います。
以前、最低でもPlugin NameだけでOKと説明しましたが、こちらも更新しておきましょう。
/*
Plugin Name: (プラグインの名前)
Plugin URI: (プラグインの説明と更新を示すページの URI)
Description: (プラグインの短い説明)
Version: (プラグインのバージョン番号。例: 1.0)
Author: (プラグイン作者の名前)
Author URI: (プラグイン作者の URI)
License: (ライセンス名の「スラッグ」 例: GPL2)
*/
申請作業
wordpress.orgにアップロード
さて、色々準備をしてきましたが、ようやく申請です。
プラグインファイルとreadme.txt、スクリーンショット画像をまとめたzipファイルを作成し、外部からアクセス可能なサーバにアップロードしておきます。
そして、WordPressのプラグイン申請ページで、各入力内容を記入し申請します。
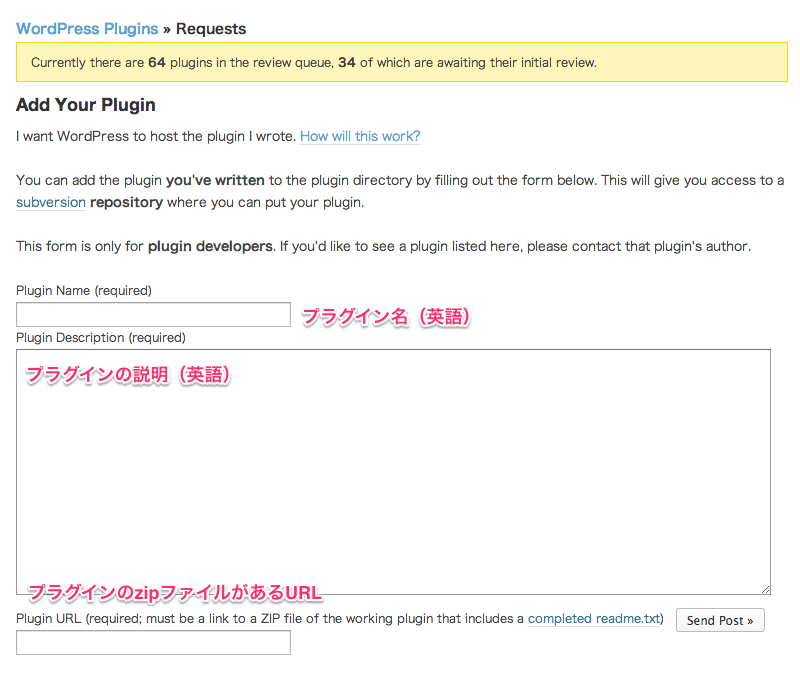
これで申請完了です。
審査が通過し承認されると、WordPress.orgからその旨のメールが届きます。
申請ページにもありますが、現在申請している数と審査中の数が出ていますので、タイミングによっては結構待たされる場合もあるようです。
僕が以前申請した際は、2、3日程度でした。
もし、審査に引っかかた場合、その理由などが書かれたメールが届くそうなので、そちらを基に修正するなり、WordPress.orgとやり取りし、再申請となります。
審査が通ったら
審査を無事通過し公開可能となりますと、そのプラグイン用のsvnのリポジトリが与えられます。
前述の、承認されたという連絡のメールにリポジトリのURLが記載されているので、ローカル環境にリポジトリをチェックアウトし、プラグインファイルなどを追加し、コミットします。
// 作業ディレクトリを作成
mkdir ~/workspace/wordpress-plugin/
// チェックアウト
svn co [wordpress.orgから届いたリポジトリURL] ~/workspace/wordpress-plugin/

// プラグインなどファイルコピー
cp file/to/path/my-plugin.php ~/workspace/wordpress-plugin/trunk/my-plugin.php
cp file/to/path/readme.txt ~/workspace/wordpress-plugin/trunk/readme.txt

// svnに追加
svn add trunk/*

// コミット
svn ci -m 'コミットメッセージ'
参照:http://wordpress.org/plugins/about/svn/
コミットが完了すると、15分程度でWordPress.orgに反映され、めでたく公開となります。
以後、プラグインの更新は、このsvnからコミットし更新して反映していきます。
また、コミットする際、svnのtrunkやtagsと同階層にassetsディレクトリを作成し画像を追加すると、WordPress.orgのプラグインページのアイキャッチ的な部分に画像が反映されます。
画像ファイルの仕様は以下になります。
ファイル名:banner-772×250.png
幅:772px
高さ:250pxになります。
画像の種類は、jpg,pngのどちらかです。
また高解像度ディスプレイ向けに、以下の仕様の画像を用意すると、サイト側で動的に切り替えてくれます。
ファイル名:banner-1544×500.png
幅:1544px
高さ:500px


